Pages

Monday, February 27, 2012

Manually uninstalling CRM 2011

I encountered a situation where CRM 2011 did not uninstall cleanly which left the server in a state of limbo i.e. you could not re-install CRM as the setup process detected that CRM was still installed and prevented re-installation, but the CRM program was also absent from the Add/Remove Programs and therefore you could not re-run the uninstaller.

I also encountered this situation with CRM 4.0 but in that case there is a published KB article describing how to go about uninstalling the application manually. I could not find an equivalent CRM 2011 KB article so - given the lack of options - I decided to follow the instructions outlined in the 4.0 KB article.

The end result was that I managed to uninstall the application following these guidelines but I had to substitute some pieces of this process as outlined below. Please note that this is not an official guideline from Microsoft so you will need to assume the risk in following these steps.

In short, you need to walk through the steps in the following KB article:

http://support.microsoft.com/kb/946980/en-us

However in Step #7:


  • Replace references of 059DD8CB00184F24E99A62CF4D6109FA with 55D425C090410500DBE735E02565E025 (points 2-11).


  • Replace references of {BC8DD950-8100-42F4-9EA9-26FCD41690AF} with {0C524D55-1409-0050-BD7E-530E52560E52} (points 21-22).


Thursday, February 23, 2012

Convert Email Body to Plain Text

If you wish to create a report on the email body within CRM, the problem is that if you just retrieve the data from the email body it will appear with all the html tags which is not too pretty to say the least.


But luckily there's an easy way to handle this. To do so, follow these steps:


  • Highlight the report expression containing the html text and select "Placeholder Properties..."


  •   Select the Markup Type option of "HTML - Interpret HTML tags as styles"


And that's pretty much it. Now the html text renders as, well... html text (not technically "plain text" as indicated by the title of this post).


Monday, February 13, 2012

Dymo Printing

Need to connect your CRM installation to a custom label printer such as a Dymo printer? The following is another good example of customizing the CRM 2011 ribbon in order to the connect a Dymo printer in a context sensitive manner. We'll assume that we're integrating the Dymo printer to the CRM contact form. The end result is shown below whereby the address of the opened contact is sent to a Dymo label printer by simply clicking the "Dymo Print" icon.


So how can this be configured?

Start by using the Visual Ribbon Editor to configure the Dymo Print button on the ribbon (notice that I borrowed the icons for this from "Print Quote" icons but you could of course define your own web resource images and link to the those).


In the actions section, define a jscript function called DymoPrint and reference the jscript library where this function will live.


You can also define a DisplayRule so that the icon only shows in Existing forms (i.e. not the Create form). This makes sense as you should only be able to print once the form has been saved.


Add the jscript function to the jscript web resource indicated in the screenshot above which consists of 2 parts:

  1. Concatenate the print string
  2. Call the Dymo printer add-in

Note that in order for this to work the Dymo printer needs to be installed on the local computer. If this is not the case a friendly error message will be issued.

It also looks for the Label.lwl file which specifies the formatting for the print out in the 3 locations specified in the script. If you are using a different file name or this is in a different file path, you will need to update the script accordingly.


function DymoPrint() {

      var texttocopy = "";
     
      try {
                if (Xrm.Page.getAttribute("address1_line1").getValue() != null)                
                      texttocopy += "\n" + Xrm.Page.getAttribute("address1_line1").getValue();        
                if (Xrm.Page.getAttribute("address1_line2").getValue() != null)                
                      texttocopy += " " + Xrm.Page.getAttribute("address1_line2").getValue();           
                if (Xrm.Page.getAttribute("address1_line3").getValue() != null)                
                      texttocopy += " " + Xrm.Page.getAttribute("address1_line3").getValue();           
                if (Xrm.Page.getAttribute("address1_city").getValue() != null)                 
                      texttocopy += "\n" + Xrm.Page.getAttribute("address1_city").getValue() + ",";           
                if (Xrm.Page.getAttribute("address1_stateorprovince").getValue() != null)
                    texttocopy += " " + Xrm.Page.getAttribute("address1_stateorprovince").getText();           
                if (Xrm.Page.getAttribute("address1_postalcode").getValue() != null)                 
                      texttocopy += " " + Xrm.Page.getAttribute("address1_postalcode").getValue();         
                if (Xrm.Page.getAttribute("address1_country").getValue() != null)
                    texttocopy += "\n" + Xrm.Page.getAttribute("address1_country").getText();     

                var DymoAddIn, DymoLabel;
                DymoAddIn = new ActiveXObject("DYMO.DymoAddIn"); 
                DymoLabel = new ActiveXObject("DYMO.DymoLabels");
                if(DymoAddIn.Open("C:\\Documents and Settings\\All Users\\Documents\\DYMO Label\\Label Files\\LABEL.LWL"))   {           
                      DymoLabel.SetAddress(1, texttocopy);       
                      DymoAddIn.Print(1, true);
                }   else if (DymoAddIn.Open("C:\\Program Files\\DYMO Label\\Label Files\\LABEL.LWL"))   {      
                      DymoLabel.SetAddress(1, texttocopy);       
                      DymoAddIn.Print(1, true);
                }   else if (DymoAddIn.Open("C:\\Users\\Public\\Documents\\DYMO Label\\Label Files\\LABEL.LWL"))   {      
                      DymoLabel.SetAddress(1, texttocopy);       
                      DymoAddIn.Print(1, true); }  
                else   {           
                      alert("Error: Label file LABEL.LWL Not Found! Please speak to your system admin");
                }
      } catch(e) {     
            alert("You do not have the Dymo AddIn installed. This is required for printing labels."); 
            alert(texttocopy);
      }

}


Thursday, February 9, 2012

CRM 2011: Regarding not passed for Activity Sub-Grids

One of the great improvements of CRM 2011 is the ability to very quickly and easily embed sub-grids into a parent entity. However I came across an issue with regards to the activity sub-grids i.e. tasks, emails, faxes, phone calls, appointments, etc. with regards to context sensitivity.

For example, you can embed the Phone Calls sub-grid into an account entity as follows:


However, when you want to subsequently add a new phone call to the account by clicking on the sub-grid and clicking "Add New Phone Call", you would expect that the "Regarding" on the resulting phone call form would be defaulted to the account record (or whichever the parent record is) from where you navigated. After all, this is not only common sense but also how it works for every other "Related Regarding" sub-grid (at least all cases that I tried other than the aforementioned activity sub-grids). You might expect this behavior... but unfortunately you will be disappointed in this case.


Conversely, if you add an activity via one of the other form workarounds (i.e. default methods of adding an activity), the regarding is passed through. Which is all well and good, but all those approaches involve a few additional clicks not to mention that when you have an embedded sub-grid the workflow shown in the screenshot above is the most logical one to be following.


It should also be pointed out that embedding the activities as a sub-grid is the only way to have direct access to the specific activity type rather than having them co-mingled under the more generic "Activities" link. That is, the ability to add the "Phone Calls" (using the above example) to the left hand navigation links is not supported and therefore is not an alternative solution for this predicament.

I opened a ticket with Microsoft support to troubleshoot this issue and although this issue is acknowledged it seems the development team has not yet prioritized this for fixing. So it seems for the time being, we just need to live with this oversight and use one of the workarounds available i.e.:


  • Activities | Add New Activity | Phone Call
  • Add | Phone Call

Or... if the additional clicks is something that you'd prefer not to live with you can always move the activity buttons on the ribbon to the main tab.

Wednesday, February 8, 2012

Dynamics CRM Search

One feature that is still not offered out of the box as part of the Dynamics CRM offering is a cross purpose search engine. While you can effectively perform searches using Advanced Find, Quick Find, Custom Reports etc. all of those searches involve navigating to a particular area of the application and pulling up the relevant view or report. A much desired feature in many organizations is the ability to have a single search "landing page" where you can enter in your search criteria and have that search across the relevant entities in CRM. Many competitive solutions to Dynamics CRM offer such a search capability.

The Dynamics CRM Search tool is designed to fill such a gap. This solution is fairly "low tech" in that it leverages the powerful reporting capability of SSRS in order to deliver the results. And it can be configured to suit the needs of any organization. This CRM Search tool is compatible with CRM 2011 and CRM 4.0.

Below are some configuration samples to illustrate usage scenarios.

"Out of the box" deployment


When deployed out of the box this is how the CRM Search will appear. By default it is configured to search across the account, contact, lead opportunity, and case entities. As illustrated, the more search criteria specified the further the result is refined. So for example, the search criteria shown in the screenshot will return all accounts beginning with "a" along with any contacts that belong to an account beginning with "a" and have a last name beginning with "d".


Highly Modified


The search criteria can be modified to search the particular requirements of your CRM deployment. Most of the fields and search criteria represent data that do not exist in the out of the box CRM deployment.


"Search All" 


This example illustrates the ability to have a “Search All” search field. If for example, you enter “Thomp” in the Search All field – the search will run a “contains” search as follows:

  • In accounts for any accounts that have a matching name, address, contact information
  • In contacts for any contacts that have matching first name, last name, address, contact information
  • In any other entity/fields that the "search all" is configured to run against (according to your installation requirements)

The remaining fields can be used to do a more targeted search if that’s your preference


Notes search capability


This illustrates the ability to search against notes entered in the CRM database. So for example, if you remember having entered a note containing a particular phrase but cannot recall who you entered it for, you can enter it in the Notes field and have the account, contact, etc. where that note was entered returned to you.


Of course the above are just samples of how this can be configured - you can configure it to have a combination of some of the features shown or to be entirely different based on the specific requirements of your CRM installation. In addition, you are not limited to a single search console, you can create as many as necessary to meet the requirements of different departments or teams.

For more information on how to obtain a license for this tool, please visit our product page.

Tuesday, February 7, 2012

CRM 2011 Visual Ribbon Editor

A while back I wrote up a few blog posts on how to go about adding buttons to the application ribbon. Since that time, a new tool called the "CRM 2011 Visual Ribbon Editor" has been released. This tool can be downloaded from codeplex.

This tool significantly simplifies the process of adding buttons to the ribbon by providing - as the name suggests - a graphical user interface for interacting with the CRM ribbon.


This tool doesn't completely eliminate the requirement of having to understand the various ribbon components and how to go about implementing Actions, Display and Enable Rules. However one of the biggest benefits is that it does all the legwork as far as formatting the underlying XML which can be a little tricky when trying to manually configure this option.

Simple requirements - such as adding a URL link to the ribbon - can indeed be performed entirely using this tool. However more complex requirements will still require manual intervention such as writing the jscript function that the Action, Enable or Display rule may call.

In addition to this, the author of this tool also mentions that it does not cover all configuration scenarios that the ribbon XML offers and lists a number of cases that are not supported on the codeplex home page. But even in those cases, this tool provides an excellent starting point by allowing for the basic XML structure to be created.

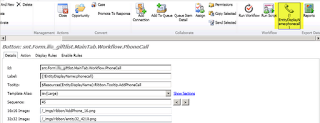
For example, I wanted to configure the "Phone Call" button such that it appears on the MainTab of a form. To do so, I pretty much copied the definition from the "Add Phone" under the Related tab.


Before this feature can work it is necessary to also pass a parameter to the jscript function (this can be viewed by downloading the application ribbon definitions) which can not be performed currently using this tool. At this point, all that is necessary is to export the entity ribbon in question, manually configure the XML to pass the parameter, and then re-import the updated application ribbon XML.


In short, I was able to use XML visual editor to configure 90% of the ribbon component and not have to worry too much about making sure that the XML structure respected the ribbon schema definition. The remaining 10% needed be configured manually by just updating the relevant parts within the already formatted XML structure. Very useful indeed.

Monday, February 6, 2012

CRM 2011: ExportRibbonXML executable

In order to view existing Ribbon Definitions in CRM 2011 you can compile the code ExportRibbonXML source code as described here.

Alternatively you can skip this and just download the compiled version from here. Once downloaded, unzip the file and run the ExportRibbonXml.exe. When prompted fill in the connection information as shown below.


The output will be written to a sub-folder called "ExportedRibbonXml" under the folder where the application was launched from. If you are presented with the following error, make sure that the user you are running the tool with has write permissions on the folder.


The output will contain all the default ribbon definitions along with any implementation specific custom entity ribbon definitions. Being able to inspect these definitions can come in handy when customizing the ribbon.

CRM 2011: CRM Anywhere

Today Microsoft announced their next major service update code-named R8. They are dubbing this release as "CRM Anywhere" presumably to the increased accessibility, platform support and industry focus that this release is being touted to bring which includes:


  • Release of a new product called Microsoft Dynamics CRM Mobile which will provide access to all the major mobile platforms including Windows Phone 7.6, Blackberry, iPhone, iPad and Blackberry. This appears to be powered by the CWR Mobility ISV solution.
  • The long awaited compatibility with all the major browsers (IE, Safari, Firefox, and Chrome)
  • SQL Server 2012 compatibility
  • Industry Templates including Wealth Management and Non-Profit

Additional details can be viewed in the Release Preview Guide.

Wednesday, February 1, 2012

CRM 2011: Sub-grid display label not showing

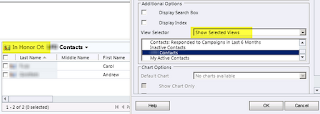
I was attempting to add a sub-grid to a form but for some reason the display label was not showing even though it was set to show and was displaying in the designer view.


This definitely seems like a bug to me. However with a little bit of research I discovered a workaround solution. Basically if you change the View Selector from the "Off" option to either "Show All" or "Show Selected Views" the name will subsequently show up above the grid section.


This is not an ideal solution as you often do not want to show the View Selector for an embedded sub-grid and from a design perspective, it probably should display the way that it appears in the Designer (i.e. with the title to the left of the grid). But for the time being, this solution will have to do.